Amazon Web Service (AWS) accelerates businesses' ability to establishing and maintaining their internet presence by managing hardware infrastructure. This removes the need for companies to manage procurement, maintenance, monitoring, and replacement/upgrade of hardware. Now system administrators are tasked with monitoring these Elastic Compute Cloud (EC2) instances to guarantee availability, scaling, routing optimization, load balancing, software upgrades, and security patches. MarkLogic Data Hub Service makes this even easier. MarkLogic Data Hub Service is a fully automated cloud service to integrate data from silos. Delivered as a cloud service, it provides on-demand capacity, auto-scaling, automated database operations, and proven enterprise data security. This enables agile teams to immediately start the work that delivers business value, integrating and curating data for both operational and analytical use.
This guide gets non-AWS users up and running quickly, and will focus on the specific components you need to get up and running. This guide is not meant to be the ultimate reference for all the technologies involved. Further reading is recommended.
1. Server Overview
MarkLogic will be hosted in the cloud via AWS. The diagram below provides a simplistic overview of the server and network resources that we want to establish:
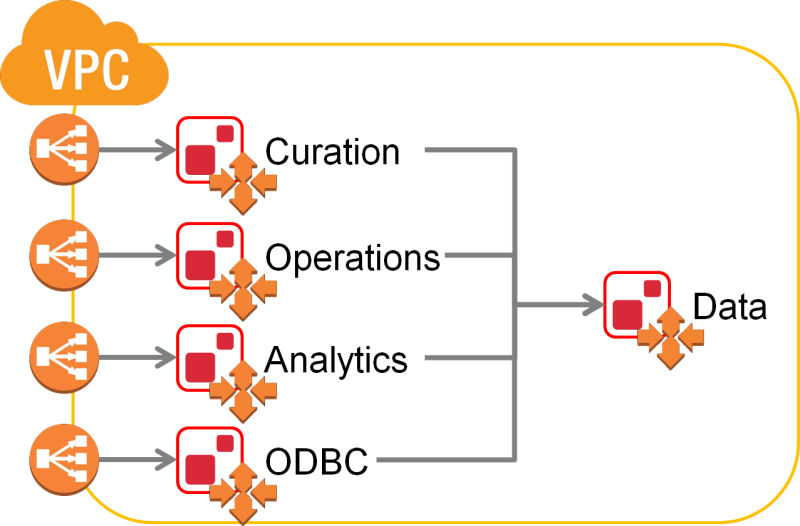
A Virtual Private Cloud (VPC) is a virtual network of hosts that is isolated from all other virtual networks. This provides more control over the hosts inside, reduces the risk of unauthorized communication to/from outside the network, and improves communication between hosts by removing the need to traverse the wider internet to talk to the host sitting nearby.
This VPC is managed by MarkLogic and employs auto-scaling configurations to automatically increase and decrease the number of resources as usage spikes and drops. This handles DevOps-related issues for the Data Hub Service user. It can be configured as something publicly accessible or something that is hidden behind a bastion server for compliance purposes. To allow smooth communication between the ever changing number of MarkLogic servers, a load balancer sits in front to coordinate incoming requests.
A more detailed architectural diagram is available in the MarkLogic Data Hub Service Admin Online Help.
Please look at the Resource Checklist in the Appendix before moving forward; this checklist will help in keeping track of the resource IDs we will generate and use.
2. Account Setup
Amazon Web Services
If you already have an AWS account, then you may skip this section of the guide.
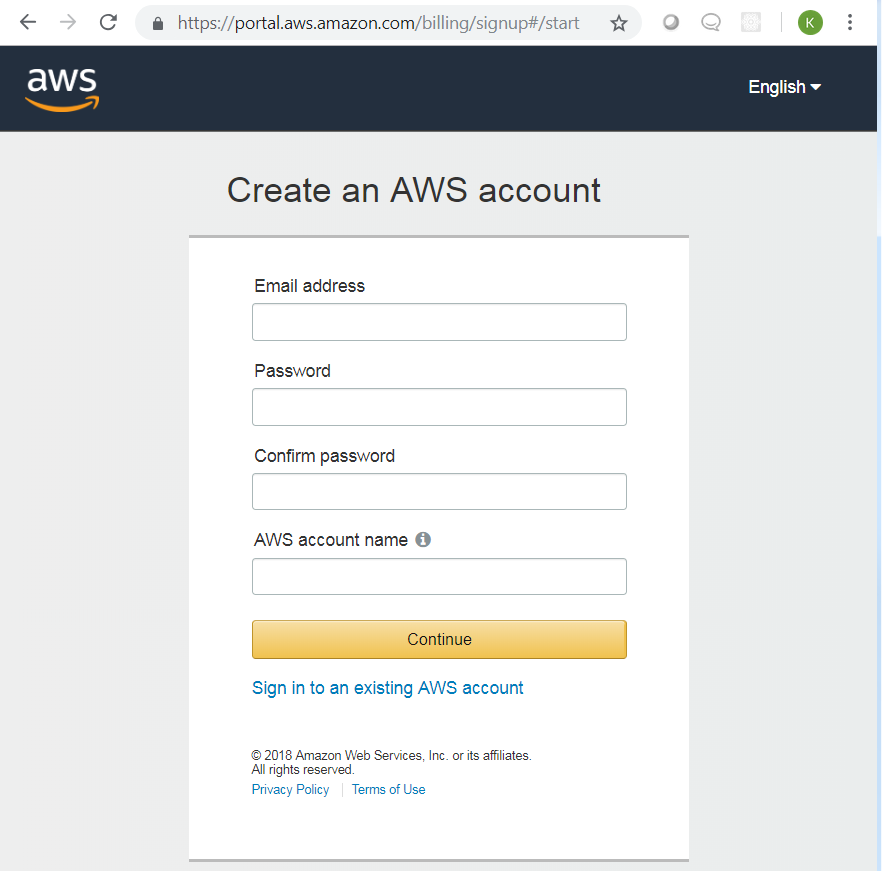
Creating an AWS account will display the screen below. Complete the process to create an AWS account, including your payment method and verification of your contact number.
MarkLogic Cloud Service
If you have already subscribed to MarkLogic Cloud Service, then you may skip this section of the guide.
Go to the Amazon marketplace and search for "MarkLogic". Look for the "MarkLogic Cloud Service" entry as shown below and click on "subscribe" on the loaded page.

After subscribing, you should get redirected to the MarkLogic Cloud Service home page. Note that this account is separate from your AWS account, so click on “Create a new Account” to proceed.
3. Create a Network Configuration
At this point, you can decide whether to have a publicly accessible MarkLogic cluster or a private cluster accessible only via a bastion server. A public cluster can easily be set up and is recommended for people trying to get familiar with the product. Private clusters, on the other hand, provide another layer of security by controlling access to the MarkLogic cluster.
3a. Public Network
This is the simplest and most straightforward way of creating a Data Hub instance.
- Go to https://cloudservices.marklogic.com and click on Network in the top navigation.
- Click on the "Add Network" button.
- Supply the Name and the preferred Region. Do NOT check the VPC peering option.
- Click on the Configure button
- Wait for the provisioning to complete. Make sure to click the refresh icon every so often.
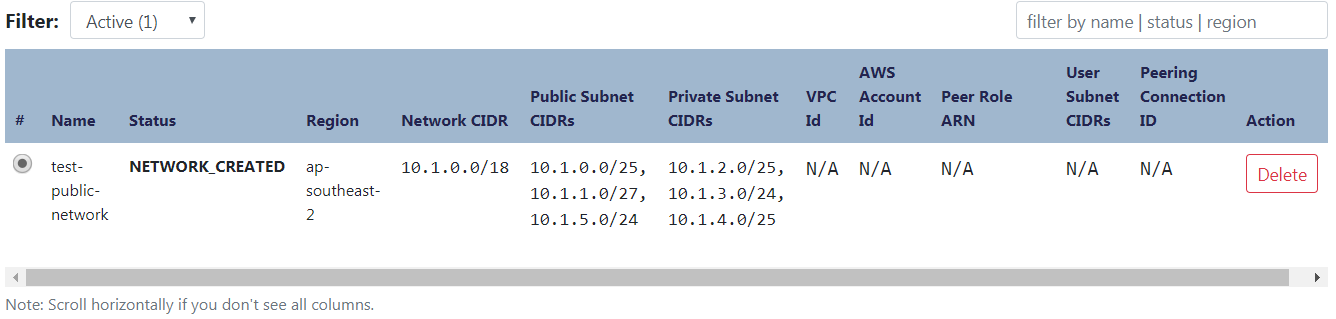
You should end up with something like the following:
3b. Private Network
The diagram below provides a simplistic overview of the server and network resource that we want to establish:
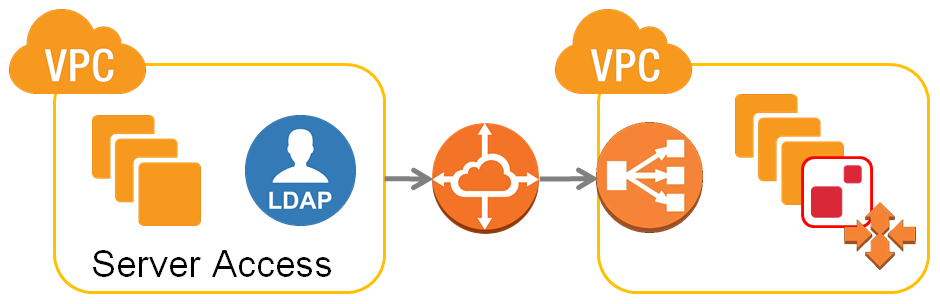
The VPC on the right is the VPC we described in "1. Server Overview" section at the beginning of this guide. The VPC on the left is a customer-managed VPC. Customers can then control who can access these servers via internal authentication settings, LDAP servers, or other means. They can also install applications here that make use of MarkLogic and serve the end user’s needs. This section will also give a simple guide in setting up peering and routing configurations required for communication between VPCs.
Note: AWS charges for the customer VPC is separate from DHS charges
Please use the "Resource Checklist" available at the end of this guide to assist you in keeping track of the various information we will be using.
Obtain AWS Account Number
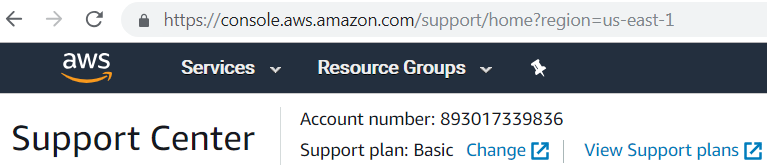
Go to your AWS home page >> Support >> Support Center:
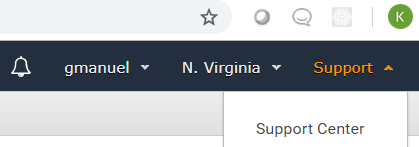
Click on Support Center and take note of your “AWS Account number”; we will be using this later.
Create your Key Pairs
Create the public and private key pairs that will be used later in building the VPC.
- Go to https://console.aws.amazon.com/ec2/
- Under "Network and Security", click on "Key Pairs"
- Click on "Create Key Pair"
- Provide a name and save the certificate file somewhere safe.
You should end up with something like the following; take note of the "Key pair name", as we will be using this later:
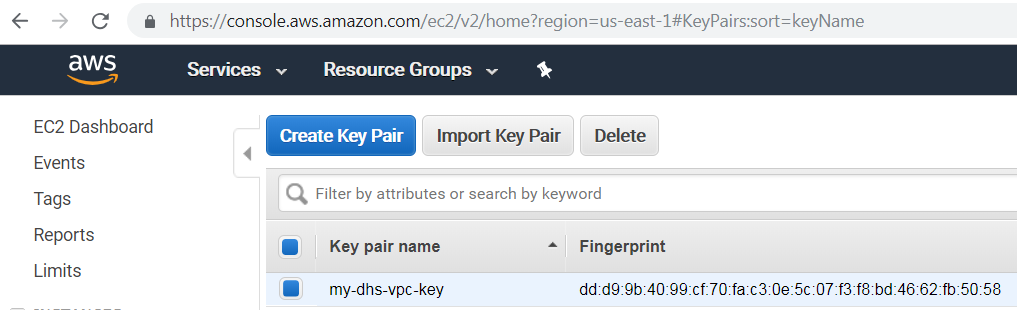
Note: Create this key-pair for each region for which you intend to create a VPC. Secure the generated certificate file(s), as this would grant root level SSH access to the bastion server that gets provisioned.
Create your VPC
If your company has its own policies for establishing VPC’s, take note of the following information for later in the guide, then proceed to "Create the VPC Peer Role" below:
- Bastion Host IP
- Public Route Table ID
- Private Route Table ID
- VPC ID
- VPC CIDR
- VPC Public and Private Subnet CIDRs
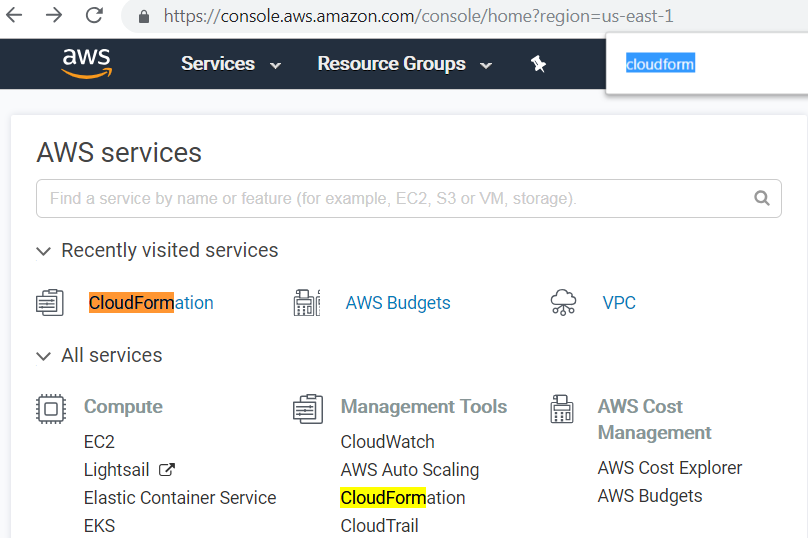
For those without any experience in setting up VPC’s, you may follow the steps below:
- Go to your Amazon console and look for "CloudFormation" under "Management Tools":
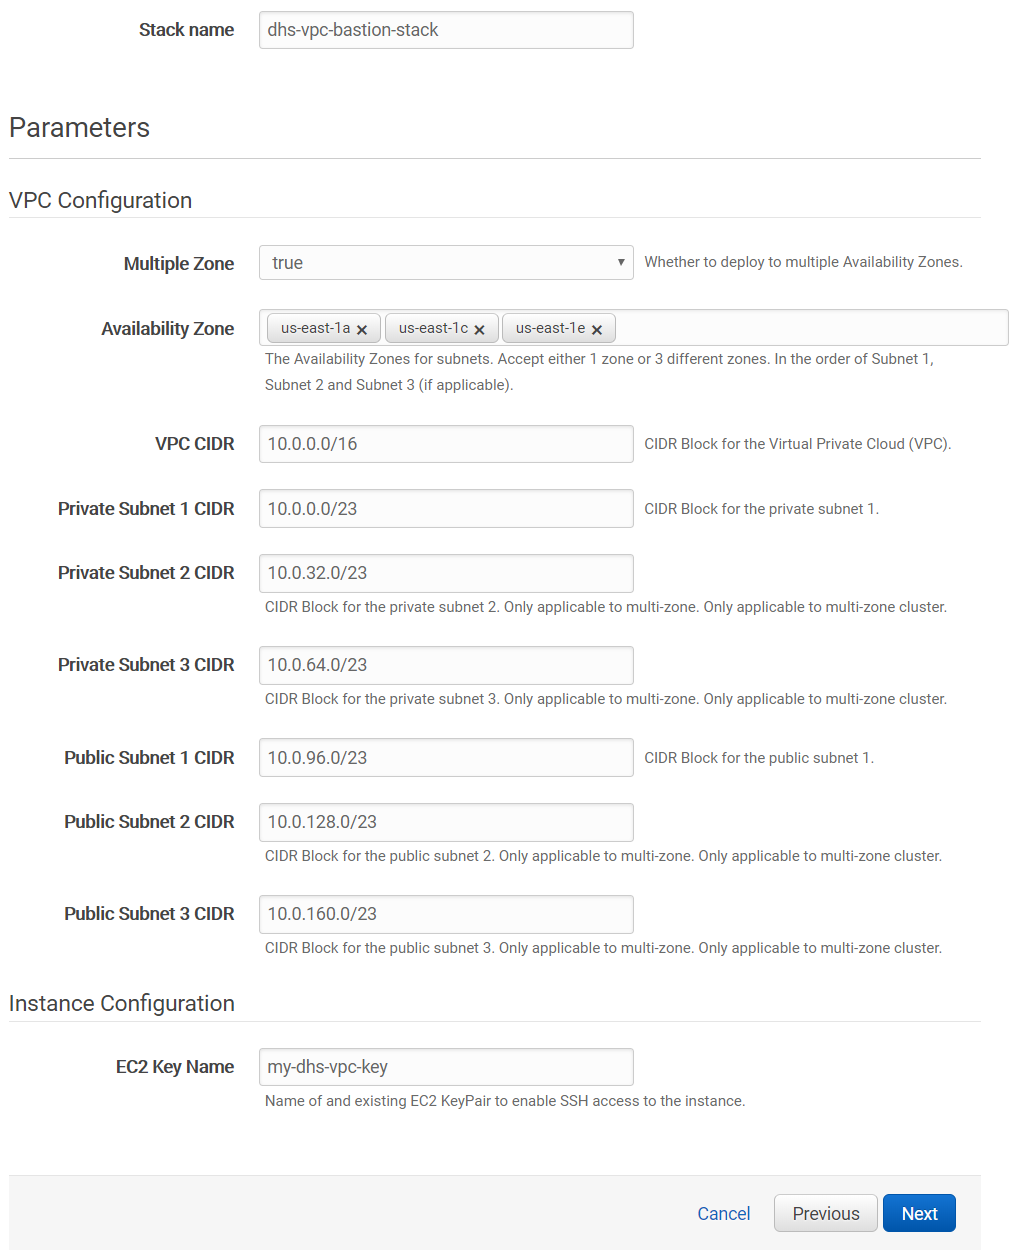
- Create a new stack by specifying an Amazon S3 template URL (example template). If you decide to use more than three availability zones, download the above template and modify the file to add more entries for private and public subnets, route associations, etc., then use "Upload a template to Amazon S3" as the option when creating a CloudFormation stack instead of using the example template
- Select three of your preferred availability zones. Data Hub Service requires at least three availability zones to ensure high availability (HA). Should one availability zone collapse, the cluster would continue to function. The above example template has a max of three availability zones.
- Adjust the various Classless Inter-Domain Routing (CIDR) values only if you have not used the example template and your existing VPC has an IP overlap with the default values. CIDR is used to allocate an IP address for each subnet. More information about how these CIDR values are used is available in the AWS VPC User Guide.
- Provide the key name generated in the previous section "Create your Key Pairs", i.e. in this case my-dhs-vpc-key.
- Specify your IAM roles on the options page following the above form, then review and proceed on the last page.
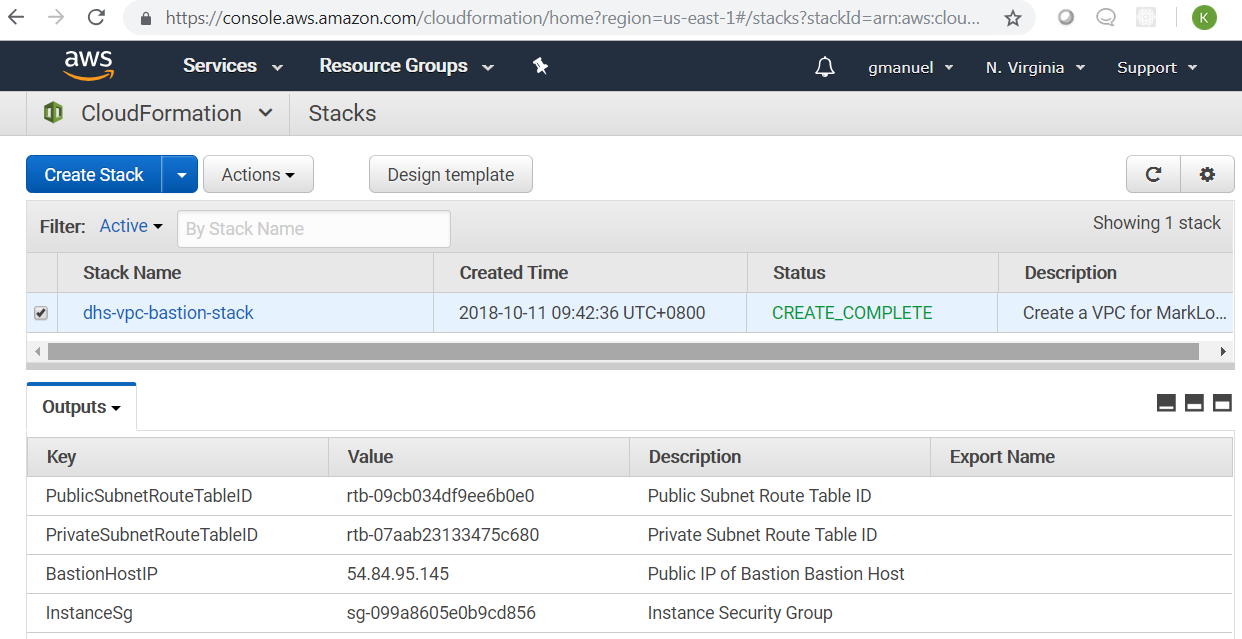
This can take a while to complete, but you should eventually have something like the following at the end. Take note of the public and private subnet route table, the public and private CIDRs used to execute this stack, as well as the BastionHostIP. We will be using them later.
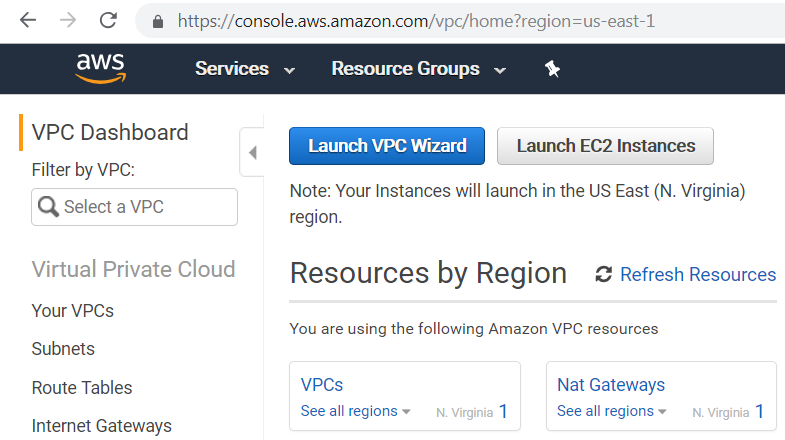
Your AWS VPC home page should look like the following:
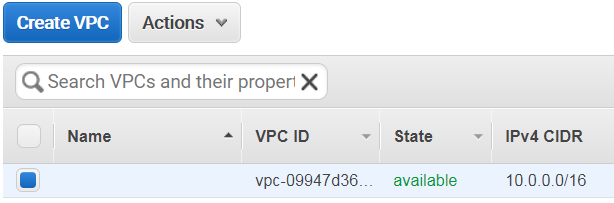
Clicking on "VPCs" will display the VPC IDs; note the VPC IDs which we will use later:
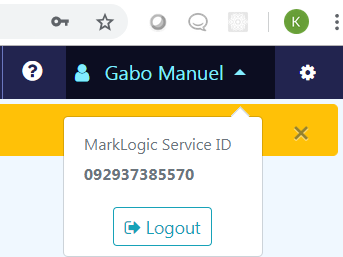
To obtain your MarkLogic Service ID, which we will be using later, go to the MarkLogic Cloud Service home page and click on your name in the upper right hand corner of the page.
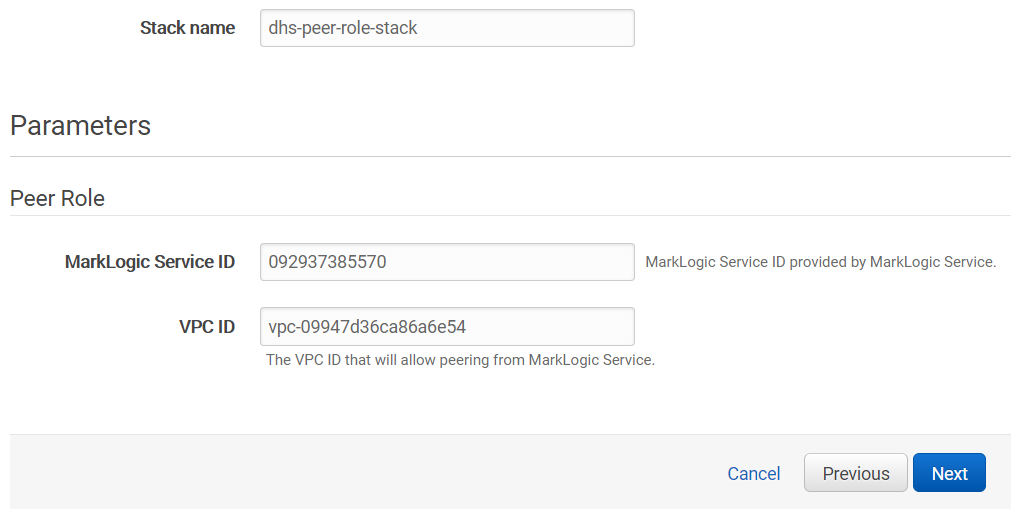
Create the VPC Peer Role
As shown in the diagram in Figure 1, we need to allow the "customer" VPC to communicate with the MarkLogic VPC by creating a "peer role". More information about VPC peering is available in the AWS VPC Peering Documentation.
- Go to your Amazon console and look for "CloudFormation" under "Management Tools".
- Create a new CloudFormation stack using this peer role template
- Complete the form below using the information we have gathered so far. Refer to Figure 7 for the MarkLogic Service ID and to Figure 6 for the VPC ID, both from the "Create your VPC" section.
- Click "Next" to proceed.
- Specify your IAM roles in the options page following the above form.
- Click on the "I acknowledge that AWS CloudFormation might create IAM resources." and click "Create"
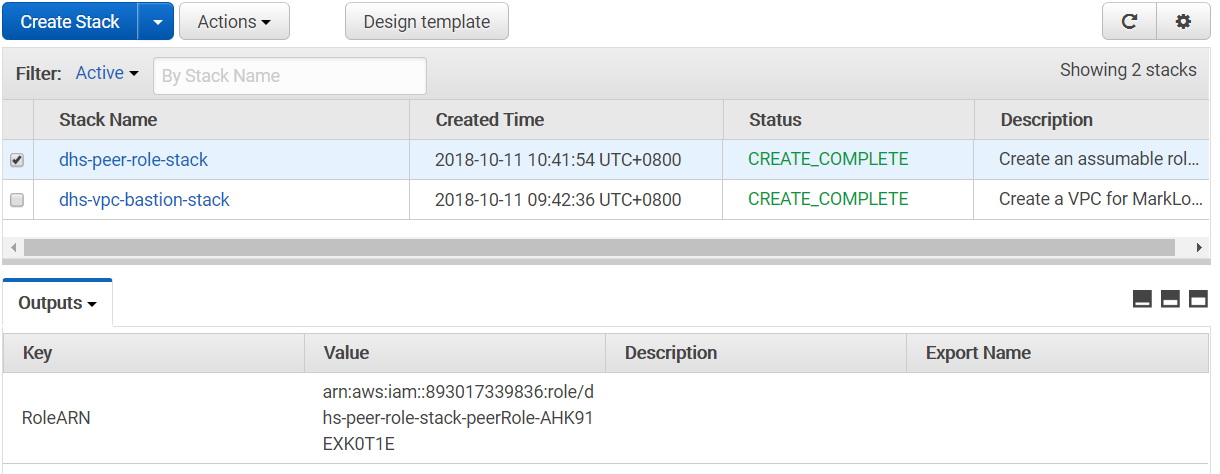
This can take a while to complete, but you should eventually have something like the following at the end. Note the RoleARN in the "Outputs" tab; we will be using it later.
Configure your Network
- Return to cloudservices.marklogic.com and click on the "Network" tab.
- Click on the "Add Network" button.
- Input the "Name" and preferred "Region" to configure the network.
- Check the peering option and supply the information we have gathered thus far.
- VPC ID is the AWS VPC ID from Figure 6 of the "Create your VPC" section.
- AWS Account ID is the AWS Account Number from from Figure 2 of the "Obtain AWS Account Number" section.
- Peer Role ARN is from Figure 8 of the "Create the VPC Peer Role" section. Do not include the trailing space/tab when you copy from a web page to this form.
- User Subnet CIDRs are all of the public and private subnet CIDRs from Figure 4 of the "Create your VPC" section.
- Network CIDR is the CIDR for the MarkLogic VPC from the right-hand side of Figure 1 in the "1. Server Overview" section. This can be left as is, if you used the default values during the steps in "Create your VPC". Make sure that the value does not overlap with the above CIDR blocks.
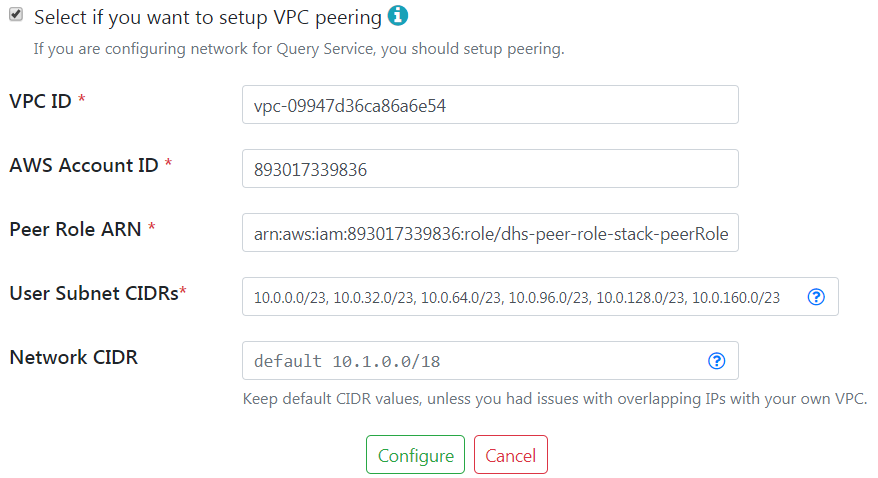
Figure 9: Network configuration - Click on "Configure" button as shown above. You do NOT need to check that check box.
This may take a while to complete… Make sure to hit the refresh button on the right every now and then. Eventually, you will see that network configuration has completed. Take note of the Peering Connection ID, e.g. pcx-079d5f1a12c607814. Additionally, take note of the public and private CIDRs generated. We would be using these later.

4. Create the MarkLogic Data Hub Service Instance
On the MarkLogic Cloud Services homepage, click on the "+ Data Hub Service" tab and supply the following information:
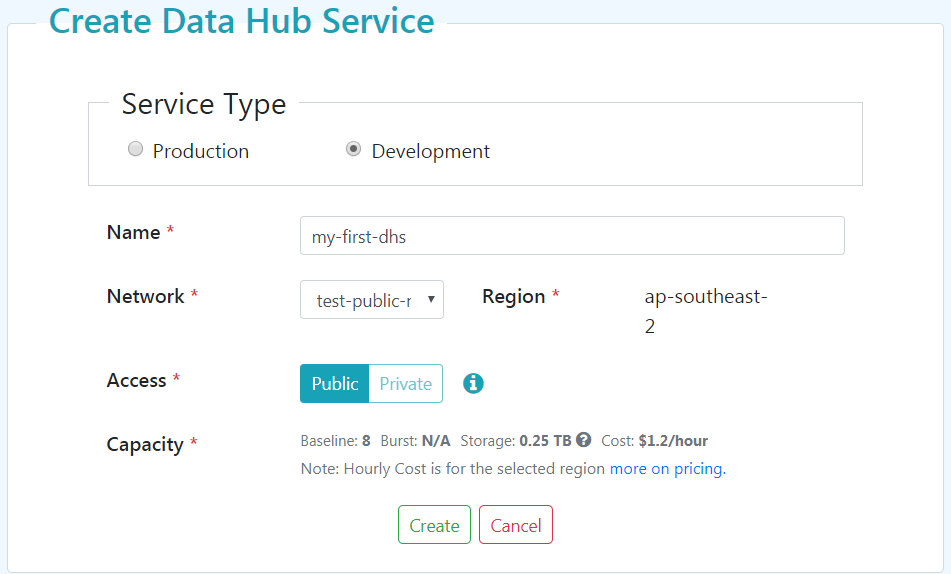
“Service Type” of “Development” will have the least amount of charges, but also the least amount of resources. This is recommended for the purposes of exploration and proof of concept deployments. This type of service will still have all the other features of the Data Hub Service except the auto-scaling of resources.
“Production” on the other hand will have auto-scaling in effect. You can set the base “Capacity” using the slider as shown below:

Do note that the cost adjusts depending on the capacity you specify. The higher the capacity value, the higher the hourly cost. For the purposes of this guide, we will use the “Development” type of service.
"Private" access is only applicable to networks that have configured "Peering" information. Review the last few steps of the "Private Network" of the previous section for more information.
Clicking on “Create” will spawn the MarkLogic VPC as described in “1. Server Overview”. This can take around ten minutes or so. You can hit the “refresh” icon on the upper left to get updates periodically until you get something like the following:"

Click on the "View" button to see the Data Hub Service Details:
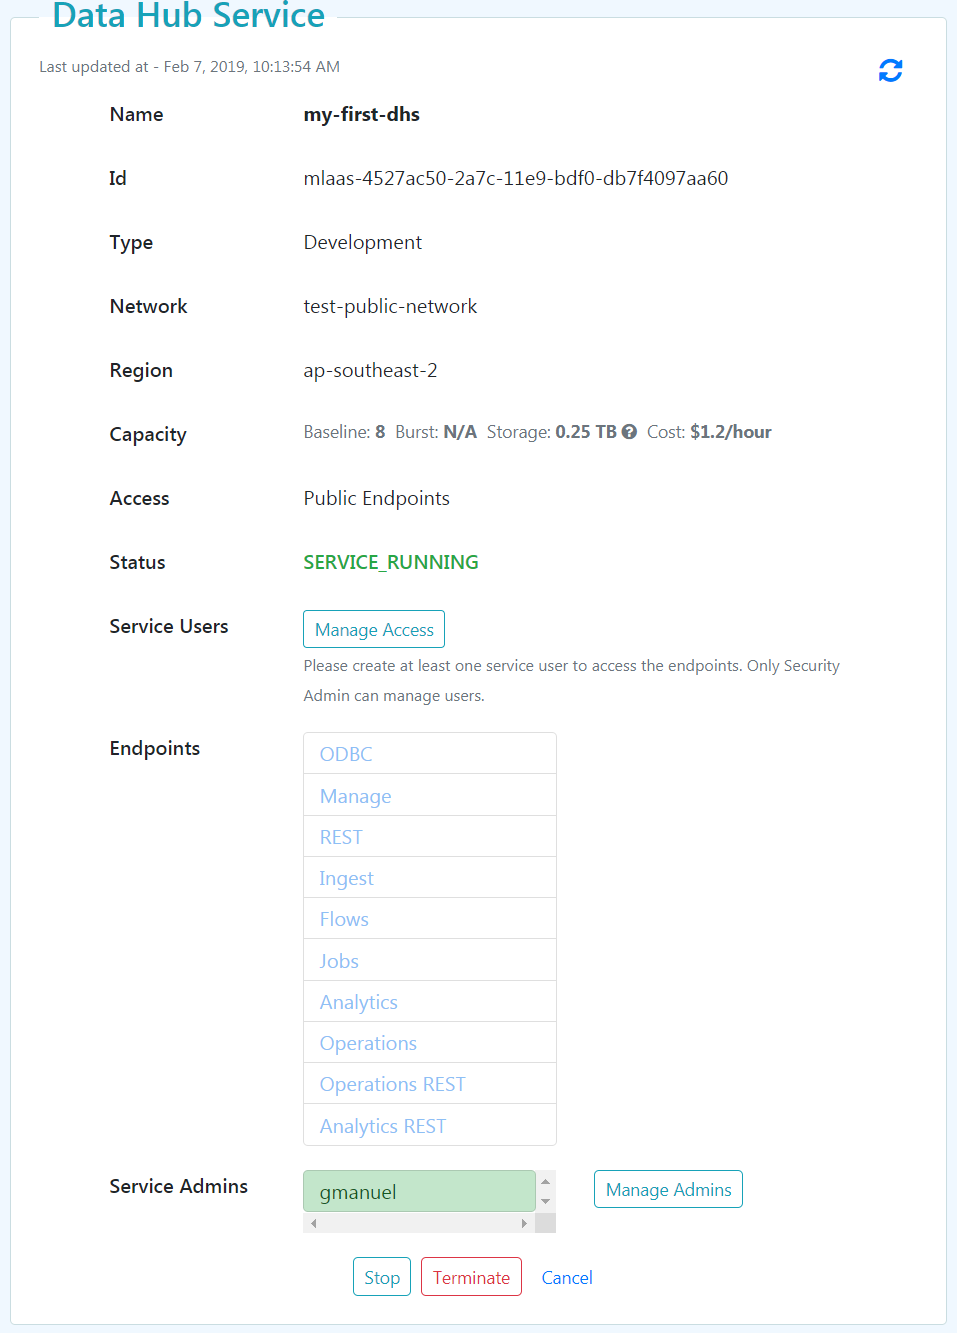
The available ports can be described as follows:
| Appserver Name | Appserver Identifier | Port | Purpose |
|---|---|---|---|
| ODBC App Server | data-hub-ODBC | 5432 | ODBC: connecting BI tools to TDE views defined in the final schema database, for rows projected from documents in the final database |
| Data Hub Services Manage App Server | data-hub-MANAGE | 8002 | Used by:
|
| XDBC Ingest App Server | data-hub-XDBC | 8005 | XDBC ingestion: MLCP ingestion into the staging database using transforms from the modules database |
| REST App Server | data-hub-ADMIN | 8004 | REST configuration: CRUD on the modules database, schemas database, and triggers database, as well as debugging and repair on the final database, using "data-hub-MODULES" as its default content database; specify the database parameter in the REST request for CRUD on the curation, schemas or triggers databases. Note: The appserver name and the appserver identifier do not match each other. |
| Data Hub Services Flows App Server | data-hub-STAGING | 8006 | Data Hub Framework curation: DMSDK and NiFi ingestion into the staging database and Data Hub harmonization from the staging database to the final database using tranforms, flows, the Data Hub Framework |
| Data Hub Services Jobs App Server | data-hub-JOBS | 8007 | Data Hub Framework jobs: access to the jobs database |
| Data Hub Services Analyzer App Server | data-hub-ANALYSYS | 8008 | Data Services analysis: invoking endpoints for analysis from the modules database on the final database using no rewriter |
| Data Hub Services Operate App Server | data-hub-OPERATION | 8009 | Data Services operations: invoking endpoints for operations from the modules database on the final database using no rewriter |
| Operations REST | data-hub-OPERATION-REST | 8010 | REST operations: invoking endpoints for operations from the modules database on the final database using standard REST rewriter |
| Analytics REST | data-hub-ANALYSYS-REST | 8011 | REST analytics: invoking endpoints for analytics from the modules database on the final database using standard REST rewriter |
5. Manage MarkLogic Data Hub Service Access
The links under "Endpoints" are disabled until users are created. To proceed in using your Data Hub Service instance, you need to specify users. Note that the service admin does not have access to all actions by default. Click on the "Manage Access" button to add users with specific roles.
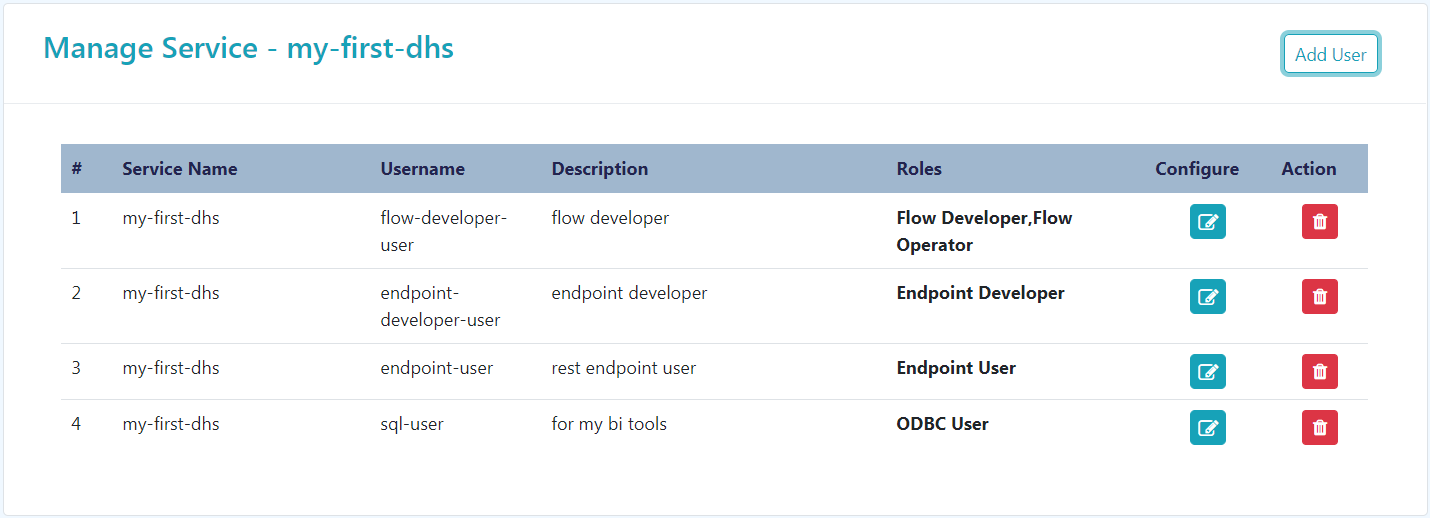
These roles are described as follows:
| Role | Can do... |
|---|---|
| Flow Developer | Can load modules into MarkLogic modules database, load TDE templates, and update indexes. Basically, your gradle task executor. |
| Flow Operator | Can do the ingest and run your ingest flow. Can execute the harmonization flow as well. |
| Endpoint Developer | A subset of "Flow Developer". Can load modules that would not overwrite any existing modules that user did not upload. CanNOT upload TDE templates nor update indexes. Meant as Data Services First developer. |
| Endpoint User | Meant to be used for the consumption of analytics and operations port. |
| ODBC User | Meant to be used for port 5432 |
Note that the users created in the screens above would not have SSH access to your servers. These are purely MarkLogic accounts to connect to the above mentioned ports.
After creating the necessary users, go back to the service page and click on the "copy" icon on the right side on the endpoints to capture a JSON document in your clipboard. You can paste this document to your editor of choice. This document will contain the ports configuration that is useful for configuring tunnels. It will have information similar to the table below.
| Endpoint | Value |
|---|---|
| Analytics | http://mlaas-AAlb-1MZUQ7UBFF33V-1890697287.ap-southeast-2.elb.amazonaws.com:8008 |
| Operation | http://mlaas-OAlb-F4BJ5ZHU4VMO-779937898.ap-southeast-2.elb.amazonaws.com:8009 |
| Ingest | http://mlaas-ICAlb-VF3QURVTPU5C-1343782760.ap-southeast-2.elb.amazonaws.com:8005 |
| Flows | http://mlaas-ICAlb-VF3QURVTPU5C-1343782760.ap-southeast-2.elb.amazonaws.com:8006 |
| Jobs | http://mlaas-ICAlb-VF3QURVTPU5C-1343782760.ap-southeast-2.elb.amazonaws.com:8007 |
| Manage | http://mlaas-ICAlb-VF3QURVTPU5C-1343782760.ap-southeast-2.elb.amazonaws.com:8002 |
| REST | http://mlaas-ICAlb-VF3QURVTPU5C-1343782760.ap-southeast-2.elb.amazonaws.com:8004 |
| ODBC | http://mlaas-4-Nlb-12NYRDQKTGLXN-41cc8c9a1f7d4cd6.elb.ap-southeast-2.amazonaws.com:5432 |
| Operations REST | http://mlaas-OAlb-F4BJ5ZHU4VMO-779937898.ap-southeast-2.elb.amazonaws.com:8010 |
| Analytics REST | http://mlaas-AAlb-1MZUQ7UBFF33V-1890697287.ap-southeast-2.elb.amazonaws.com:8011 |
We can then collect the hosts and label them as follows, since we will be using these values later for our tunnel settings.
| Host Name | Value |
|---|---|
| Analytics | internal-mlaas-AAlb-1MZUQ7UBFF33V-1890697287.ap-southeast-2.elb.amazonaws.com |
| Operation | internal-mlaas-OAlb-F4BJ5ZHU4VMO-779937898.ap-southeast-2.elb.amazonaws.com |
| Curation | internal-mlaas-ICAlb-VF3QURVTPU5C-1343782760.ap-southeast-2.elb.amazonaws.com |
| Network | internal-mlaas-4-Nlb-12NYRDQKTGLXN-41cc8c9a1f7d4cd6.elb.ap-southeast-2.amazonaws.com |
Trivia: These host names are load balancers, hence the naming pattern of "aalb", "oalb", and "icalb", which translates to analytics application load balancer, operations application load balancer, and ingest curation application load balancer, respectively.
If you opt to use a publicly accessible MarkLogic Service VPC, note that there is a different set of values since the "internal-" prefix is not present:
| Host Name | Value |
|---|---|
| Analytics | mlaas-AAlb-1MZUQ7UBFF33V-1890697287.ap-southeast-2.elb.amazonaws.com |
| Operation | mlaas-OAlb-F4BJ5ZHU4VMO-779937898.ap-southeast-2.elb.amazonaws.com |
| Curation | mlaas-ICAlb-VF3QURVTPU5C-1343782760.ap-southeast-2.elb.amazonaws.com |
| Network | mlaas-4-Nlb-12NYRDQKTGLXN-41cc8c9a1f7d4cd6.elb.ap-southeast-2.amazonaws.com |
6. Configure Routing
This is only applicable for customers who configured their MarkLogic VPC for private access only.
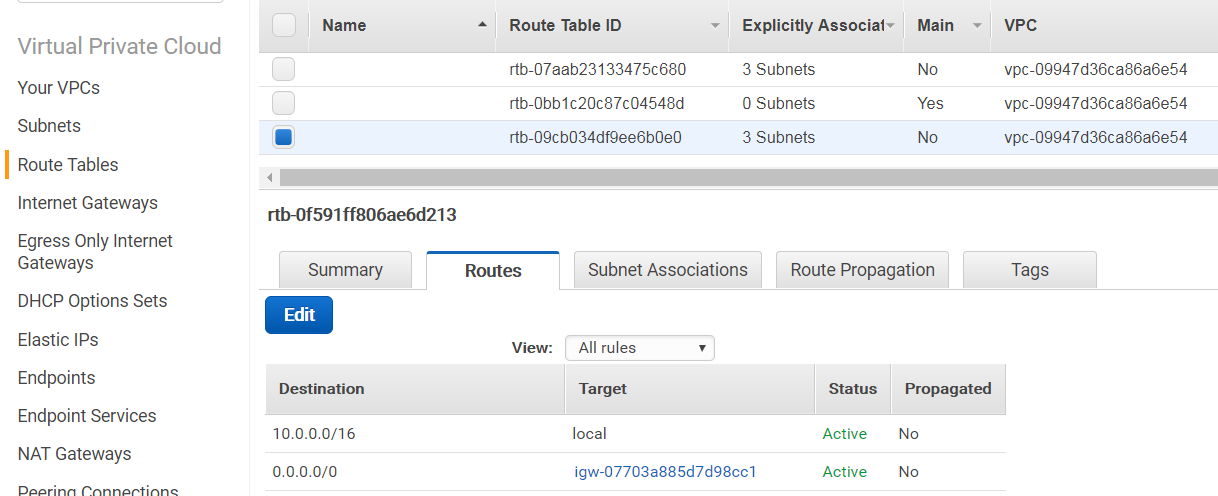
At this point, our "customer" VPC and MarkLogic VPC are up and running. We have our peering role set up to allow communication between the two VPCs, but they do not know how to find each other. We need to configure routing tables to allow our customer VPC to know the IP addresses of our MarkLogic VPCs. More information about VPC Routing is available in the AWS documentation on VPC Peering Routing and VPC Route Tables.
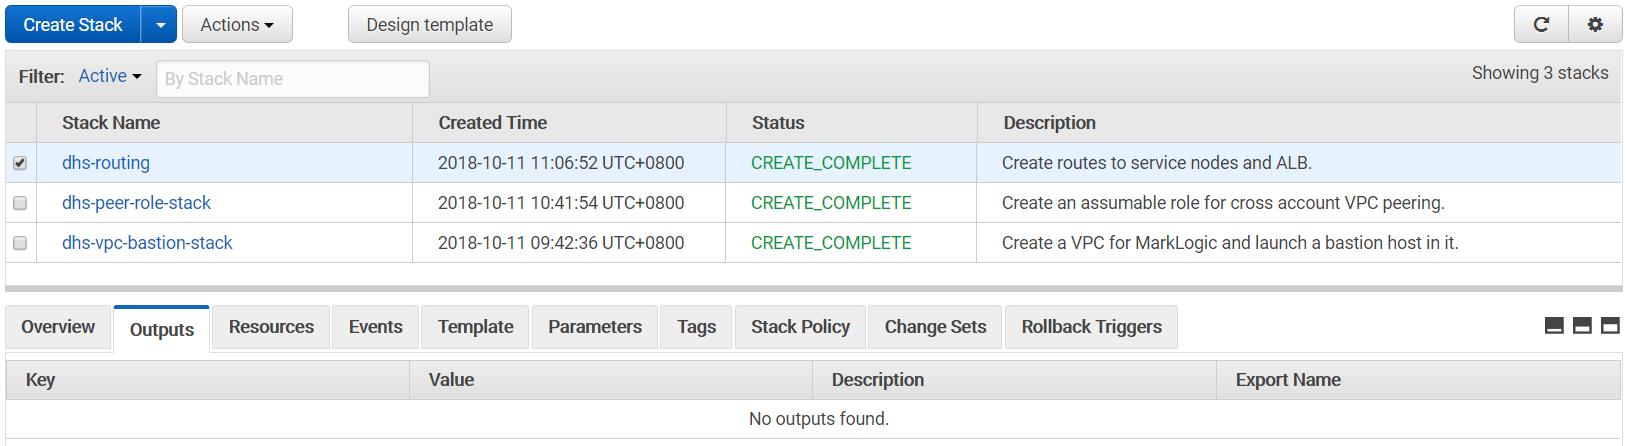
Go to your Amazon console and look for "CloudFormation" under "Management Tools". Create a new CloudFormation stack using this template. The public and private subnet route table ID will match the "PublicSubnetRouteTableID" and "PrivateSubnetRouteTableID" from Figure 4 in the "Create your VPC" section.
Alternatively, your public route table may contain an "igw-" prefixed entry (not the route table ID) in the "Routes" tab, as shown below:
While your private route table would contain an "nat-" prefixed entry in the "Routes" tab, as shown below:
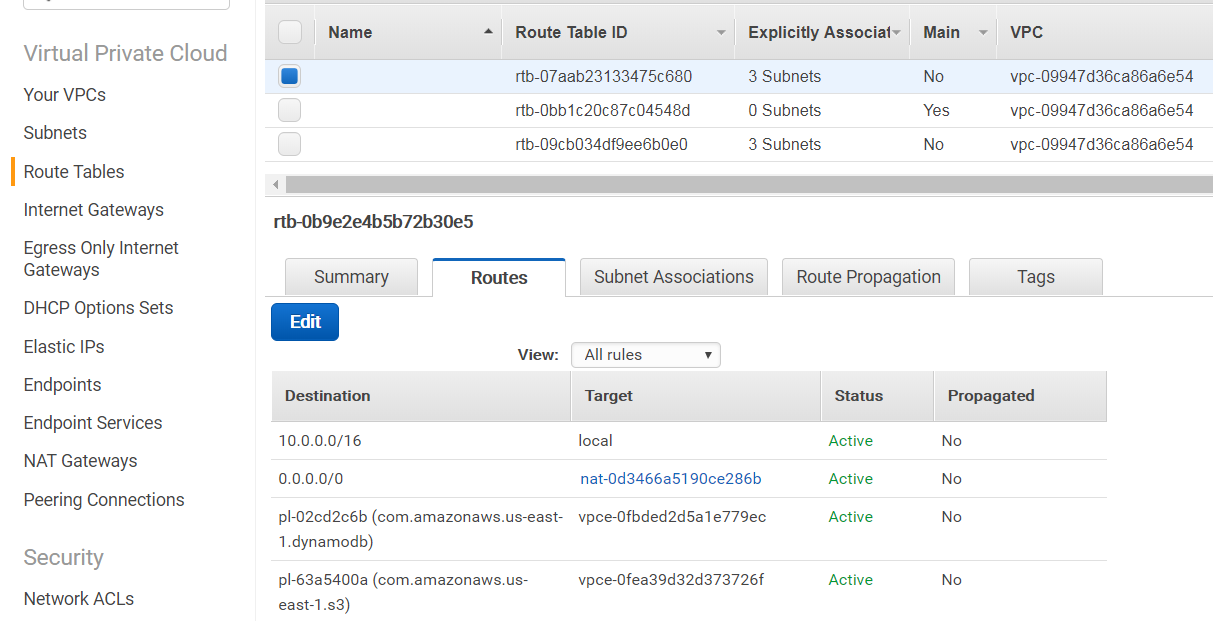
The Service Public and Private Subnet CIDRs should match the MarkLogic Network Public and Private Subnet CIDRs from the network configuration in Figure 10 from the "Configure your Network" section.
This can take a while to complete, but you should eventually have something like the following at the end:
At this point, you already have a MarkLogic cluster up and running. Your bastion server can now be hardened. Additional SSH user accounts can be generated to map to our developers that would need to connect or tunnel to the bastion server to deploy the modules and other MarkLogic configuration. Note that these SSH user accounts are different from the MarkLogic user accounts created in the "2. Account Setup" section. Additionally, these SSH users are not AWS accounts. Please do not share the ec2-user certificate to your peers.
7. Developer Access - Tunnel Setup
The provisioned MarkLogic instances are accessed via the load balancers mentioned in the "5. Manage MarkLogic Data Hub Service Access" section. If you chose a private MarkLogic Service VPC, these load balancers cannot be accessed directly and can only be accessed through the bastion server (see BastionHostIP from Figure 4 in the "Create your VPC" section). To load our modules or to push data via MLCP or DMSDK, we can either execute them at the bastion server or locally through a tunnel setup. This guide will cover the latter approach.
Windows using PuTTY
- Convert your certificate file generated in the "Create your key pairs" portion of the "3. Create a Network Configuration" section into a public/private key pair that PuTTY understands. There are several online instructions on how to proceed with this. A typical choice is to use PuTTYgen.exe.
- For Host Name, supply your bastion IP address (see BastionHostIP from Figure 4 in the "Create your VPC" section, i.e. 54.84.95.145 in this case)
- Under Connection >> Data, specify ec2-user as "Auto-login username"
- Under Connection >> SSH >> Tunnels, add the following entries:
| Source Port | Destination |
|---|---|
| 8002 | <CURATION>:8002 |
| 8004 | <CURATION>:8004 |
| 8005 | <CURATION>:8005 |
| 8006 | <CURATION>:8006 |
| 8007 | <CURATION>:8007 |
| 8008 | <ANALYTICS>:8008 |
| 8009 | <OPERATIONAL>:8009 |
| 8010 | <ANALYTICS>:8010 |
| 8011 | <OPERATIONAL>:8011 |
| 5432 | <NETWORK>:5432 |
Mac / Linux using SSH
- Save the code below from Figure 21 into a file, e.g. dhs-tunnel.sh:
- Adjust "/path/to/cert.pem" to match where you saved the certificate file generated in the "Create your key pairs" section.
- ANALYTICS, CURATION and OPERATIONAL values are taken from Figure 17 in the "5. Manage MarkLogic Data Hub Service Access" section.
- Adjust "@54.84.95.145" to match your bastion IP address from Figure 4 in the "Create your VPC" section.
- Change the file mode to allow execution, e.g.
chmod +x dhs-tunnel.sh, and run the file, e.g../dhs-tunnel.sh. - It is recommended to modify the pem file’s permission to 400, i.e.
chmod 400 /path/to/cert.pem
Port Conflicts
Developers with an existing installation of MarkLogic will notice the potential conflict with use of port 8002. You can work around this by either using 18002 (or another value) to avoid the conflict, or change the "Manage" port in your local MarkLogic installation. Here, we assume that 8002 will be used by our tunnel to communicate with our MarkLogic Data Hub Service instance.
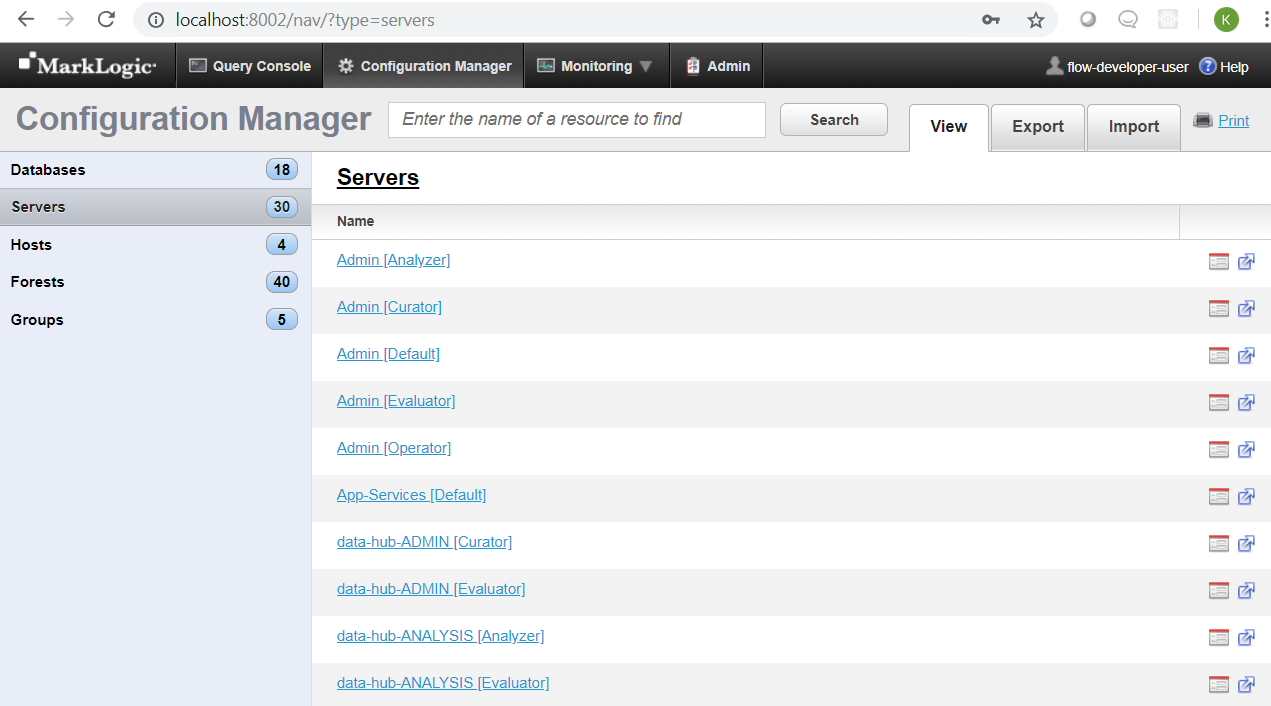
Check the Status Page
At this point, load the "Manage" endpoint to check the initial configuration available. For existing MarkLogic developers, this is your standard "Manage" app server page. If you are using a private MarkLogic Service VPC, use localhost:8002 (or equivalent port as configured in your tunnel setup). If you are using a publicly accessible MarkLogic Service VPC, use <CURATION>:8002 (e.g. mlaas-icalb-ftj4dp27w4fo-1601708577.us-east-1.elb.amazonaws.com:8002). When prompted for credentials, use your configured account with "Flow Developer" role to access this page.
8. Developer Access - Flow Developer and Operator
Note that currently you cannot use the Data Hub Framework Developer Quickstart to directly develop on top of the MarkLogic Data Hub Service instance. Most of the gradle tasks executed under the hood would require privileges not granted to the roles deployed in MarkLogic Data Hub Service. Please go to Data Hub Framework Deploy to MarkLogic Data Hub Service for an up-to-date version of these instructions. The following sections will provide some guidelines on what needs to be done and what can be done to load your modules to the Data Hub Service instance.
Project configuration
Your DHF Quickstart generated project or gradle generated project would need some adjustments. You may use the following content as template for your gradle-local.properties.
The mlManagePort would need to be adjusted if your tunnel is not using 8002. This would be the case if you have a local install of MarkLogic. Also, mlHost should point to the <CURATION> load balancer, if you have direct access (e.g. using a publicly accessible MarkLogic Service VPC or when deploying modules from inside the customer VPC or bastion host).
Note that we no longer needed to issue gradle mlDeploy (you wouldn’t be able to if you tried). The role provisioned is not allowed to perform all the tasks that mlDeploy would do.
Gradle tasks
The table below lists the tasks available and their purposes. The assumption is that you are working on a DHF project, not a traditional ml-gradle project (e.g. the working directories are different).
| Task | Purpose |
|---|---|
| mlLoadModules mlReloadModules |
Deploy your code (or redeploy, if needed) under <project-root>/plugins/ |
| mlUpdateIndexes | Deploy your indexes, as defined in <project-root>/src/hub-internal-config/databases/your-db.json |
| mlDeployViewSchemas | Deploy your TDE templates, as defined in <project-root>/src/hub-internal-config/schemas/tde/your-template.json |
| hubRunFlow | Run your harmonization flow |
Ingest of Data via MLCP
MarkLogic Content Pump (MLCP) has been the tool of choice for data ingest for years. The -options_file below can be used as reference when running MLCP command. Note the following:
- The difference in the
-transform_module. -restrict_hostsis also a key factor to make the MLCP command execute via tunnel.- Port 8006 may also be used.
- At least MLCP version 9.0.7 is required.
Ingest of Data via DMSDK
The sample code below can be used as reference when developing your ingest code. Note that MarkLogic Java Client API v 4.1.1 is required. To explore more, check out the Data Movement SDK Tutorial.
Harmonization
Harmonization can be executed as normal:
gradle hubRunFlow -PentityName="YourEntity" -PflowName="YourHarmonizeFlowName" -PflowType="harmonize"
Data Services First
AnalyticsServer:8008 and Operational:8009 are both Data Services First API app servers. See the previous section regarding deployment of MarkLogic modules. Read more about Data Services First.
9. Further Reading and Feedback
If you run into issues using MarkLogic Data Hub Service, please contact Support. MarkLogic engineers and enthusiasts are also active on Stack Overflow; be sure to tag your questions as ‘marklogic’.
Additional reading is recommended as follows:
Appendix: Resource Checklist
This table can be used to keep track of what we need for each stage of configuration. This is particularly useful for the System Administrator, given the number of actions that need to be taken.
| Field | Requires | Example Value |
|---|---|---|
| AWS Account | Email address Billing information |
|
| AWS Account ID | 893017339836 | |
| key-pair-name | AWS account | my-dhs-key-pair |
| AWS Certificate | AWS account | my-dhs-key-pair.pem |
| VPC CIDR | 10.0.0.0/16 | |
| VPC Public and Private Subnet CIDRs | 10.0.0.0/23 10.0.32.0/23 10.0.64.0/23 10.0.96.0/23 10.0.128.0/23 10.0.160.0/23 |
|
| VPC ID | VPC CIDR VPC Public and Private Subnet CIDRs key-pair-name |
vpc-09947d36ca86a6e54 |
| Bastion Host IP | 54.84.95.145 | |
| Public Route Table ID | rtb-09cb034df9ee6b0e0 | |
| Private Route Table ID | rtb-07aab23133475c680 | |
| MarkLogic Service ID | MarkLogic Cloud Services subscription in AWS Marketplace MarkLogic Cloud Service Page signup |
092937385570 |
| RoleARN | VPC ID MarkLogic Service ID |
arn:aws:iam:893017339836:role/dhs-peer-role-stack-peerRole-AHK91EXK0T1E |
| Peering Connection ID | VPC ID AWS Account ID Peer Role ARN VPC Public and Private Subnet CIDRs Region |
pcx-070ec6719c1d60c8b |
| Analytics Load Balancer | Data Hub Service users configured | internal-mlaas-aalb-1f50xgvrnt8yn-911654599.us-east-1.elb.amazonaws.com |
| Operations Load Balancer | Data Hub Service users configured | internal-mlaas-oalb-1cwwevqwhl8s7-1243328676.us-east-1.elb.amazonaws.com |
| Curation Load Balancer | Data Hub Service users configured | internal-mlaas-icalb-gaqd4thwz10v-1190497851.us-east-1.elb.amazonaws.com |