This version of the tutorial applies to MarkLogic 6 and MarkLogic 7. For MarkLogic 8 and later, see the updated version.
This tutorial will walk you through the creation of a simple MarkLogic based application. The only prerequisites to this tutorial are that you have downloaded and installed the latest version of the MarkLogic server. Installation instructions for the server can be found here. OK, now that we've covered the prerequisites let's start the actual tutorial!
The first thing we are going to need for this application is some sort of XML content. Without any content our application is going to be rather hard to test and somewhat dull. So, for the purposes of this tutorial we're going to use some Shakespeare plays in XML format. The content can be found here. At this point all you need to do is download the zip file and extract the contents to your disk somewhere. We'll get back to our content in a little while.
Configuration
While Shakespeare's works are downloading, let's set up MarkLogic for our project. We will need a few things:
- A content database to hold the data
- An HTTP application server to host an application
- A modules database to hold the source code for that application
To create these items, we'll use the MarkLogic Management API. Create a file called shakespeare-app.xml and paste this into it:
This XML tells MarkLogic what we want to create: an HTTP application server called "Shakespeare", which will listen on port 8010; a database for content called shakespeare-content; and a database for the application's source code called "shakespeare-modules.
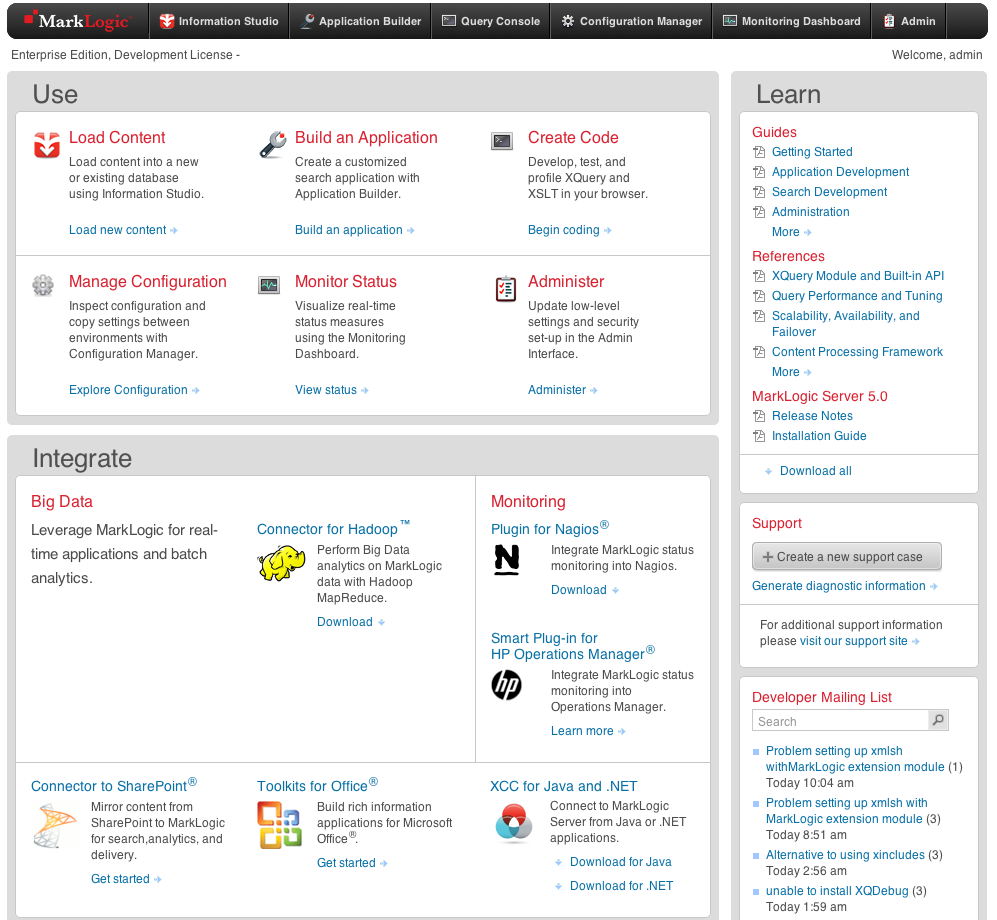
database where this content is going to live. Your MarkLogic server is administered via your web browser via a default address of http://localhost:8000. The first step to creating our new database is to enter that address in our browser. That should result in a screen that looks like this (click to see images full size):
This page is essentially your command center for MarkLogic. From here, you have the ability to access all of the key MarkLogic screens including the Admin Console, Information Studio, Application Buiilder, the Configuration Manager and the Query Console. Additionally, on this screen you will get some information on the latest open source projects as well as plugins and what's happening in the MarkLogic community. For now let's click on the "Information Studio" link located on the very top of the page, next to the MarkLogic logo.
You are now looking at the initial page for MarkLogic's Information Studio application. Information Studio is an easy to use application that is designed to make it very easy to load content into MarkLogic. We are going to explore just a few of its many features in this tutorial. We will use Information Studio to quickly create our database and to load our content. If you want a lot more detailed information about Information Studio take a look at the Information Studio Developer's Guide. To create the database we are going to use for this application click on the "New Database" link at the top of the page. You will get an overlay window asking you for the name of the new database. For simplicity's sake, name the database "Shakespeak" and click on the "Create Database" button. You will now notice that the dropdown box on the top left of the screen now indicates that your new Shakespear database is the currently selected database. That's all there was to that. We now have an empty database ready to go!
Loading Our First Files
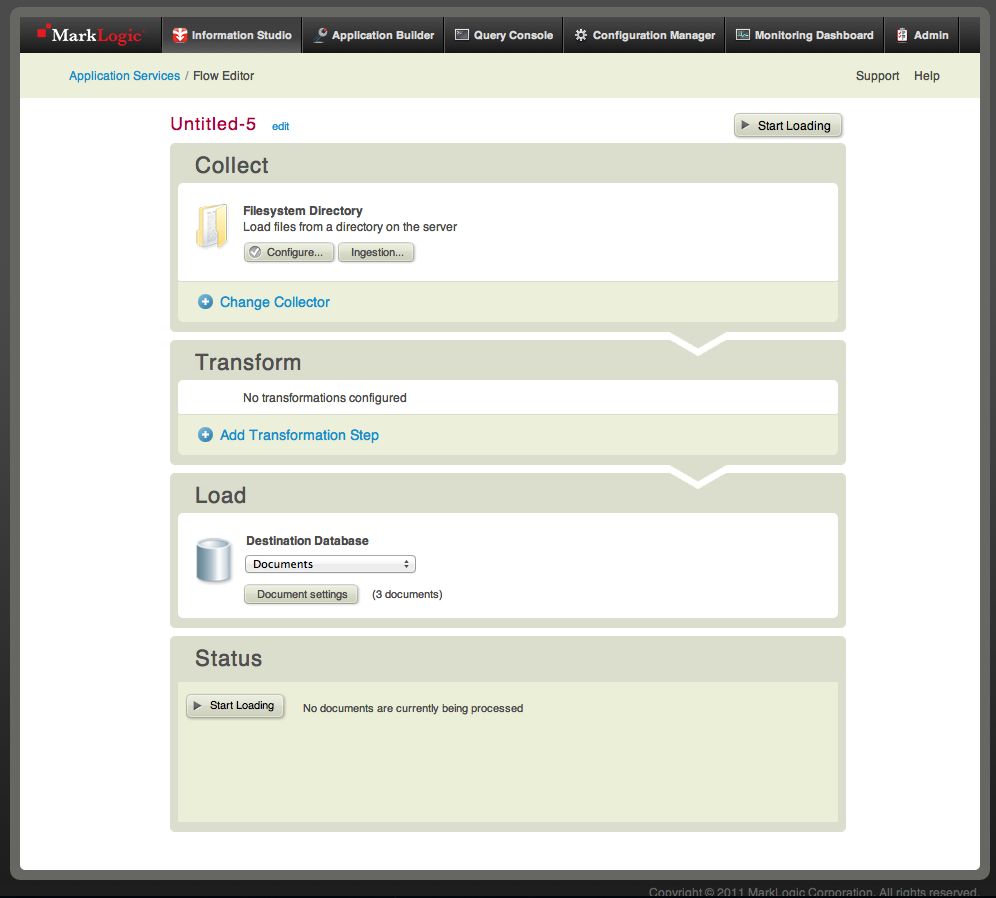
Now that we have our MarkLogic database setup let's load it with some data. As you have undoubtedly noticed, your screen is currently dividen into two main sections. The top section is labled "Application Builder Applications". This section provides us access to Application Builder (no real surprise here) which is a web based tool for building search applications. We're not going to cover this tool in this tutorial. Instead, we are going to focus on the second half of the current screen which is titled, "Information Studio Flows". Click on the "New Flow" button at the bottom of the page to get started and you will be presented with the following page:
We will discuss, at least briefly, every section of this page as we load our Shakespeare data. Let's start off with a simple house keeping chore. You have provably noticed that near the top of the screen is some red text containing a rather unimformative name for the Information Sutdio flow you have just created. There is, however, a small "edit" link just to the right of that text. Go ahead and click on the "edit" link and rename this flow to "Shakespeare Load" and click on the "Done" key. Much better. Now we have a reasonable name for this flow. At this point I should probably say something about flows, especially as I have had you create a new flow and give it a name. Flow is the term used by Information Studio to describe a sequence of steps (including collecting data, optionally transforming the data and then loading it into a target database) taken in order to load data into a database. For a much more in-depth exploration of Information Studio I recommend you look at the Information Studio Developer's Guide.
The first thing we want to do is tell Information Studio what data we want to work with. This is done in the Collect step within our flow. You can see that within this step we are already setup to use the built in Filesystem Collector which is, unsurprisingly, designed to use files from our file system. We just need to configure it to use the correct directory. To do that click on the "Configure" button within the Collect box and enter the path to the directory where you unzipped the Shakespeare files. After you have clicked on the "OK" button you will once again be editing your Shakespeare Load flow and you should now notice that the "Configure" box now has a green check mark in it, indicating that this collector is properly configured.
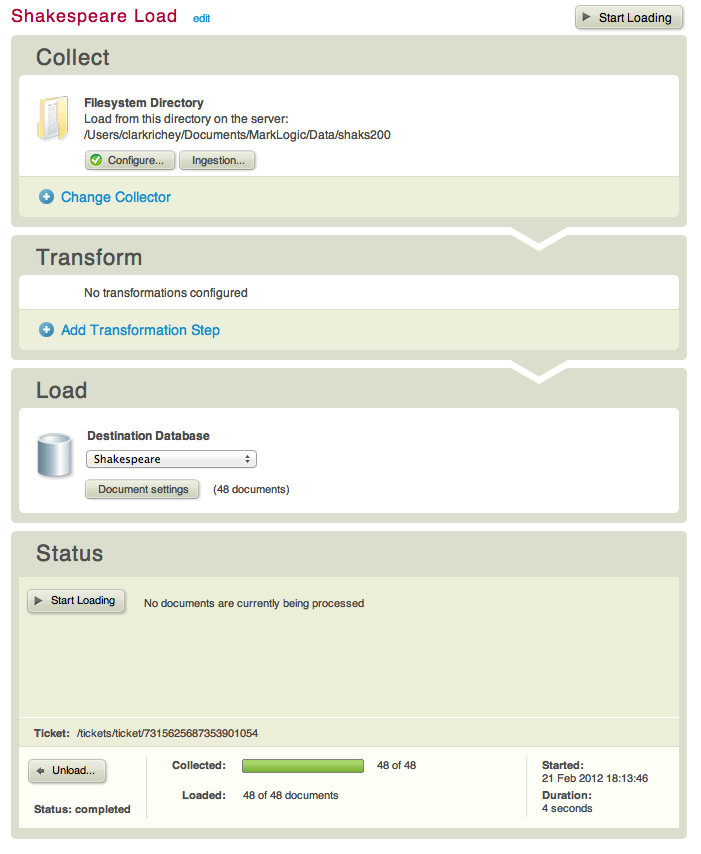
The next section of this screen is labled "Transform" and is used when we want to apply some transformation(s) to our data prior to loading it into our database. For the simple case we are working with here this step is unnecessary so we will move on the the "Load" portion of the screen. Here you will find a drop down list with all of the databases that exist within MarkLogic. We want to load our Shakespeare data into the Shakespeare database that we just created a few minutes ago, so please select that database from the dropdown. Once that is done all that remains is to click on the "Start Loading" button in the "Status" portion of the server. This will cause the server to start loading your files and when done, your screen will look something like this:
Within the "Status" section of the screen you will now see a section that is labled with a Ticket id which is a uri (which will be different from the one I show in the screen shot). The ticket is used by Information Studio to persist information about the load that you just initiated. Underneath the Ticket id you should see that 48 documents were collected from the filesystem and then loaded into your database. It is definitely worth noting that you can use the "Unload" button in this section to unload all of the documents that were loaded by that Information Studio ticket. This is a very handy feature, especially if you loaded data from several different directories. Unloading the data loaded under one ticket will not effect the data that was loaded under another ticket. It is not clearing the entire database but truly just unloading specific documents associated with that ticket. Go ahead and play with it now if you like. You can easily re-load the data just by clicking on the "Start Loading" button once again.
Getting Started with Query Console
OK. That was easy enough. However, like most programmers, I'm somewhat skeptical. Sure, the Status section of my Information Studio flow says that it loaded 48 documents in the database but how do I know that those are my documents? How do I know they were loaded corretly? Well, we can use Query Console to help us verify that our documents are in the database (and to do lots of other stuff as well). Query Console is basically a web based programming environment for the MarkLogic server. To access Query Console all you need to do is to click on the "Query Console" link at the top of your page. Really. That's it. Go ahead, do it. I'll wait...Super! You're back. You should now seem something very much like this:
The first thing we want to do here is to choose which of our databases we want to set as the target for our actions in QueryConsole. We want to choose the Shapespeare database and we can do that by selecting it from the dropdown list labled "Content Source". Now we can use QueryConsole to verify that our play was loaded into the database. Click on the "explore" link near the top left of the screen, just to the right of the dropdown box you just used to select our Shakespears database. In the bottom half of your screen you should now see a list off all documents contained in our database, as well as a little bit of information about the documents. If you click on the document link you will be presented with the actual content of the document. Now we know for sure that we have the database configured and our plays loaded.
Lastly, let's get a quick glimpse of the power and utility of QueryConsole by using it to execute some XQuery for us. First, lets close the results pane we were just looking at by clicking on the small "x" located in the tool bar just above where our results appeared on the bottom half of the page. Next, in the work space on the top left of the screen, go ahead and delete all of the text except for the XQuery version statement. Now, let's enter a bit of simple XQuery to show us an HTML rendering of Speakers and their Lines. Enter the XQuery found below into the text area in QueryConsole where you just deleted the default text:
Now, select the "HTML" button and then click on the "Run" button to see the results rendered as HTML. Experiment with selecting the XML and TEXT buttons before you run the query as well to see what your output looks like in each format. That about warps things up for now! In this tutorial you've learned the fundamental skills necessary to begin programming with the MarkLogic server, from installation and configuration through data loading and executing a simple query. In upcoming tutorials we'll explore more advanced topics. Until then, don't be afraid to keep exploring on your own and don't forget that there is a ton of helpful documentation available here at http://developer.marklogic.com.
Continue on to Part 2.


 Stack Overflow: Get the most useful answers to questions from the MarkLogic community, or ask your own question.