Setup
To create a REST-based application using MarkLogic, you first need three things:
- a database,
- a RESTful application server (called a "REST API instance"), and
- some users with the appropriate privileges.
You'll create each of these in this section.
If you've already worked through the entire Java tutorial, then you can skip this entire section and move onto the next one! Otherwise, keep reading.
This tutorial assumes the following configuration. You can use different values than these; you'll just have to modify each example accordingly:
- REST host—
localhost - REST port—
8011 - rest-writer user —
rest-writer - rest-writer password—
x - rest-admin user—
rest-admin - rest-admin password—
x
Install MarkLogic
Download and install the latest version of MarkLogic from this page: http://developer.marklogic.com/products. Once you've installed and started up MarkLogic, go to the browser-based administrative interface (at http://localhost:8001/), where you'll be walked through the process of setting up the default admin user. (This tutorial assumes you'll be running MarkLogic on your local machine; if that's not the case, just substitute your server name whenever you see "localhost" in this tutorial.)
If you need more detailed instructions on installing and running MarkLogic, see Installing MarkLogic Server.
Create a database
Navigate in your browser to http://localhost:8000/appservices/ and click the "New Database" button near the top of the screen:

In the dialog that pops up, type the new database name "TutorialDB" and click "Create Database":
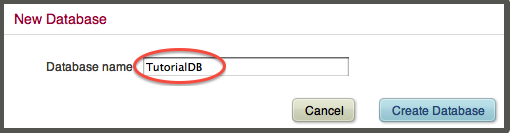
You've now created the "TutorialDB" database with the default configuration.
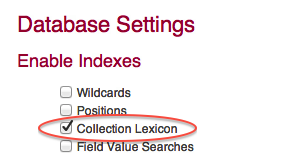
Enable the collection lexicon
The collection lexicon is an indexing feature that we'll need for the tutorial. Back at the top of the window, make sure "TutorialDB" is selected and click the "Configure" button:

Then click the checkbox next to "Collection Lexicon":
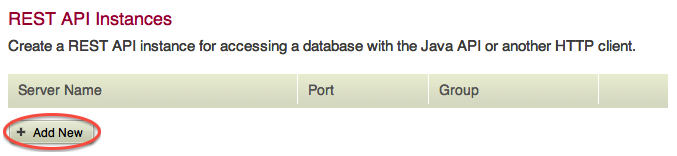
Create a REST API instance
Now you'll create the REST API instance for interacting with the database. On the same page, under "REST API Instances," click the "Add New" button:
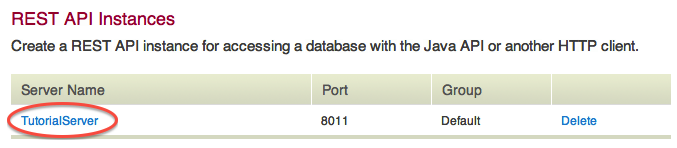
Type "TutorialServer" as the server name and choose a port number. In this tutorial, we'll use port 8011:

You should now see "TutorialServer" in the list:
By creating a REST API instance in this way, MarkLogic has automatically created and configured the underlying components for you (specifically, an HTTP app server and an associated modules database). To prove that the REST API instance is running, navigate in your browser to http://localhost:8011/. You should see a page that looks something like this:
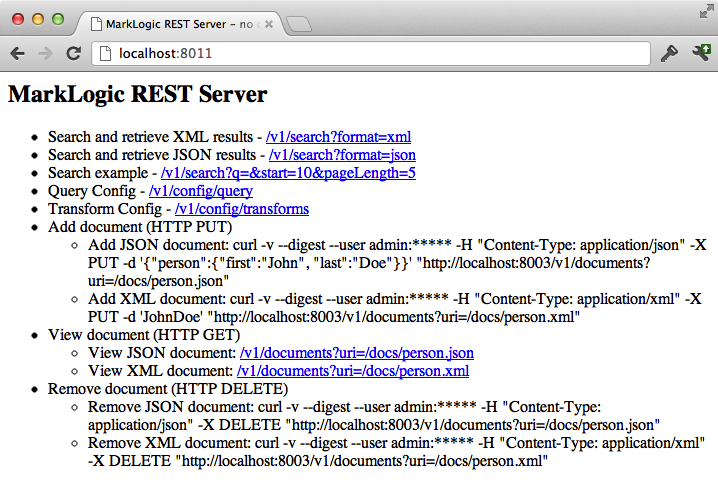
Try clicking some of the links to see the output returned. This is just a preview of what's to come.
MarkLogic also provides a REST-based bootstrapping service whereby the database admin user can create a new REST API instance using the /rest-apis endpoint on port 8002. See Creating an Instance for more details.
The rest of this tutorial assumes that you'll be running MarkLogic on your local machine at port 8011. If that's not the case, you'll need to accordingly modify the host and/or port of each example.
Create REST users
MarkLogic has a powerful and flexible security system. Before you can run the tutorial examples, you'll first need to create a user with the appropriate execute privileges. You of course could use the "admin" user (which has no security restrictions), but as a best practice, we're going to create two users:
- one with the "rest-writer" role, and
- one with the "rest-admin" role.
(There is also a "rest-reader" role available, which provides read-only access to the REST API, but we won't be using that.)
Back in your web browser, navigate to "Security"->"Users" in the admin UI at http://localhost:8001/:
![Machine generated alternative text: L] Configure Ø Groups Databases Hosts Forests Miirietypes Clusters S.curlty Robs Execute Prrvdeges URI Privileges EF Amps Collections Certificate Authorities El Certificate Templetes](/media/marklogic-rest-api_files/screenshot9.jpg)
At the top of the User Summary screen, click the "Create" tab:

On the New User screen, enter the username ("rest-writer"), password ("x"), and optional description:
![Machine generated alternative text: New User [ 0k ] carìcei user A database user. user name 7name(unique) Required. You must supply a value for user-name. description REST writer user for Java tutorial An objecrs description. password Encrypted Password. Required. confirm password Encrypted Password. Required,](/media/marklogic-rest-api_files/screenshot11.jpg)
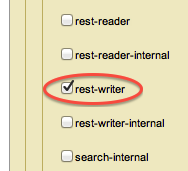
Then scroll down and check the checkbox next to the "rest-writer" role:
Click the "ok" button at the bottom of the page to create the new user.
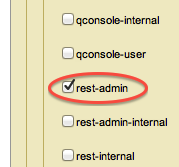
Repeat the same process (start by clicking the "Create" tab again) for the "rest-admin" user (also with password "x"). Only this time, check the "rest-admin" role instead:
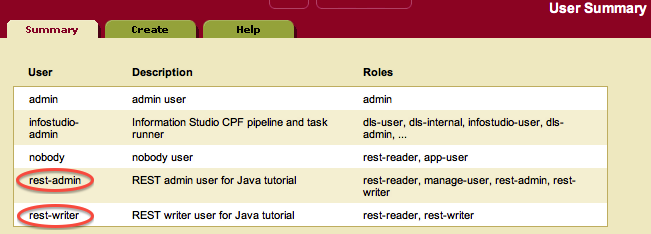
If you click the "Summary" tab, you should now see both users, with their associated roles (including inherited roles).
Now we've got everything set up on the server side, so let's start interacting with MarkLogic via the REST API.